Glenlochan -The Beginning

Glenlochan -The Beginning
Glenlochan - The Beginning

Glenlochan Today

Glenlochan Today
Glenlochan Today

Saturday, June 25, 2016

From One Shade of White to Color

First the fence had to be built (see All Fenced In) and then the fence had to be painted (see One Shade of White).  But the most fun and important part of this multi-phase project was selecting and installing the landscaping.  Consulting with a landscape designer, poring over books, pictures, and plant catalogs for weeks, we settled on the "country garden" look along the fence line.  We did all the planting ourselves - no small feat for such a long fence line, and the award goes to Rob for digging ALL of the holes. 

Here's the process from bare ground to plantings:


We then added soaker hoses along the entire planting line, installed on a handy timer so the plants won't be scorched and die of thirst while we are in Philly.


And a full trailer of mulch was quickly depleted.


Although it needs time to grow and meld into the "look" and we still need to plant a row of roses behind the fence to softly creep over the top, we do have progress, and that is the important point.  It beats mud and dirt, for sure and the yard is looking a less like a construction zone all the time.

Wednesday, June 22, 2016

Project Shutter Painting: Completed!

You may have noticed that the picture of  "Glenlochan Today" at the top of this blog has been updated.  If you look closely, you will see that this is the first picture of Glenlochan with ALL of the shutters installed.  Yup, that's right, the end of this year-long plus project arrived and I finally was able to check shutter painting off the list for a very long while (see:  Painting Shutters is not for the Perfectionist.)  I logged hours and hours on this project and Rob had them all hung in less than half a day. 

The long process included lugging shutters to Philly so I could work on the caulking and painting at all times, pictured here in the Philly small backyard:


Finally, the day arrived, in the breezeway of Glenlochan, when I put the very last coat on the very last shutter - it was a banner moment that had to be recorded:

Installation was a breeze:


And this project is a wrap....shew!

Saturday, May 7, 2016

One Shade of White

Since we became all fenced in we've been waiting for the wood to age enough to paint it.  It was supposed to be a 2015 project, but it bled into 2016 before we knew it.  Once the wood finally aged enough and the moisture reading was low enough, we then had to wait for the weather to cooperate AND the time to do an extended paint job (yes, I'm still working on the shutters, too).  This spring has been unusually cold and rainy - more like winter than spring - so outdoor projects have been very delayed. 

While we waited for the weather to break, Rob researched available paint products.  After much research, numerous trips to the store, and samples tried on extra pickets, Rob elected to use a solid color stain.  We tested the semi-transparent and the color wasn't satisfactory.  The picket fence had to be the requisite white - not off-white, not some shade of white, but the traditional "picket fence" white.  Quaint, old-fashioned, and utterly perfect (he had a vision). 

First step was to caulk around the post caps and then wash the entire fence.  I helped a bit but Rob did the lion's share of the prep. And, the weather still wasn't cooperating, so some of the washing happened in the rain. 
Then the real work began in earnest.  And solo for Rob as I was traveling for work and he was on his own once the weather broke.  He spent a solid week painting, with my help on the weekend and a bit of assistance from Joe.

The transformation was pretty remarkable.
 The giant orbs were added to the gate posted (gate still to be built):

 Slowly the fence was transformed
Looking pretty close to the vision.  Note the one missed picket, later corrected.

Next up, landscaping around the fence!

Friday, March 25, 2016

Cherry Picker Weekend(s)

So, we've been waiting for months to rent a large lift (aka a cherry picker) for a long weekend to take care of multiple tasks that we are not able to accomplish with mere ladders alone.  Did we get a small lift?  Nope.  The 50 footer that had to be towed with a truck (also rented).  Did we get it all done in one weekend?  Nope - the wind did not cooperate so this morphed from one long weekend into two. 

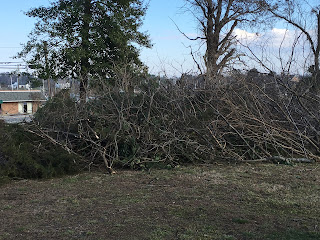
The tree trimming took the majority of our time and effort.  Rob was a master trimmer and feller of trees.  Branches that look small thirty five feet in the air appear quite large when they fall on the ground and need to be dragged and piled carefully in the growing brush pile.  I was the dragger of branches, sticks, debris.


As overgrown as the yard was when we bought Glenlochan, we've been clearing and clearing and clearing.  Now, we also want to give the trees that are remaining the best chance of survival.  So many trees were dying or dead from neglect, overcrowding and hideous vine growth.  Here's one tree that we are saving pre-vine removal.


Here's the large brush pile as evidence of our hard (exhausting) work and efforts.  It takes up more than half the back yard and is taller than all of us!


Next up was the removal of the exterior stickers from the second story awning windows.  Although the rest of the windows all had their factory stickers removed long ago, I could not reach these from inside the house because awning windows don't tilt inward.  And, being on the second floor made them impossible to reach without the lift. 


Tip - don't ever wait to remove the protective stickers from new windows - remove them immediately.  The sun and elements seal them to the windows and make removal a hundred times more difficult than a simple peel.  Three hours, several razor blades and half a bottle each of Goo be Gone and industrial strength window cleaner and the windows were clear for the first time since installation.  This was my turn in the cherry picker and I enjoyed using it (but not the sticker peeling task),  Pristine windows at last!


Last up was hanging the second story shutters.  Sadly, they are not all painted yet (still working through the caulking, priming and painting of the first story shutters) but I managed to complete those for the second story windows in time. 


The vintage look hardware and shutterdogs (the s-hooks at the bottom) were selected and ordered with care far in advance of cherry picker weekend. Rob expertly installed them on the upper three windows.


They look awesome, if a little lopsided/topheavy without shutters on the bottom windows.  Loving it.

Back to shutter painting....

Monday, March 21, 2016

Painting Shutters is Not for the Perfectionist

We could have just gone to Lowes and purchased vinyl shutters, installed them already, and been done with it.  Did we?  Of course not.  We wanted wood shutters, installed dimensionally, with period hardware.  Easier said than done.  Wood shutters are just that, unpainted wood shutters - hard to find, much more costly than their vinyl counterparts, full of extra work for the uninitiated, and likely to cause much more maintenance down the road, but we gloried in their authenticity.

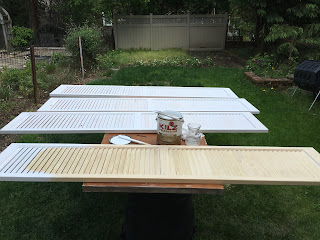
We were excited when they finally arrived, less excited when we realized that the slats were quite moveable and as such, could allow moisture to intrude causing issues sooner than we anticipated.  So, my caulking skills have been tested as I carefully caulk BOTH sides of EVERY slat in 14 shutters.  Joy.  After some experimentation, it turns out that the Qtip is the tool of choice for caulking carefully without a lot of excess beading.  UGH.  It's painful and time consuming.  And NOT for the perfectionist.


Then comes the priming.  Painting each and every slat with primer, knowing that despite best efforts, there will be drips on the other side - it's the nature of the beast with slats. It's also painful and time consuming.  And NOT for the perfectionist.


One coat of primer, two coats of black paint.  It's an endless job that I'm only half way through, despite hours upon hours of effort.  I may have my 10,000 hour in on shutter painting (not the expertise I was seeking in this lifetime), fighting my perfectionist tendencies all the way.  After all, we'd like to get the shutters hung this decade, since 2015 didn't happen.   Vinyl is looking pretty good about now!


Sunday, September 20, 2015

All Fenced In

A white picket fence is required for a historic home, isn't it?  Well, maybe not in all cases, but this house was screaming for one and Rob had a vision as to exactly how it needed to be constructed.  Because I am a visual person, I had to see it all laid out with stakes:

When the boys were home for a holiday, Rob took advantage of their brawn to help get the first two posts dug and in - 8 x 8 posts, I kid you not!


Sturdy and substantial (there was actually a lot of debate on my part about the size of the posts but I ultimately caved).  I still had my doubts throughout the process that they were just too large given the height of the fence, but it turned out that Rob was absolutely, 100% right on this one.

The remaining posts were a long process to install, even with the help of a rented automatic post hole digger.

These posts were all 6 x 6's so not a lot lighter than the gate and corner posts.  Rob finished the job solo and then started planning out the addition of the pickets.


The first section went up like clockwork:

Before too long (okay, a couple weeks total, but he was a one man show at this point) the fence was fully installed.


It's absolutely the perfect addition to the still unfinished yard.


The wood is aging so we can paint the fence the requisite white (hopefully before winter) and it needs post caps and a fancy gate to finish the picture.  It's apparently the most substantial and sturdy picket fence many have seen, according to the comments received from numerous passersby.  It's definitely a fence for the ages.