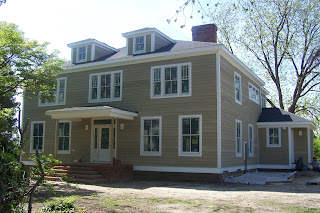
Glenlochan -The Beginning

Glenlochan -The Beginning
Glenlochan - The Beginning

Glenlochan Today

Glenlochan Today
Glenlochan Today

Thursday, May 30, 2013

The Electrification Project

We've been preparing for the eventual install of the lights in Glenlochan for a while now, but there is still much to be done.  Before the demolition began almost 2 years ago, we carefully saved and packed away the lights that were still hanging in the house, as well as all the miscellaneous glass shades, domes, and chimneys that had been stockpiled in various places throughout the home, cellar and shed.  We have been very fortunate to find a shop in Philadelphia, The Antique Lighthouse, that offers vintage lighting for sale, but also repairs and restores vintage lighting.  We have consulted on all the fixtures in the home, and we've elected to restore six out of eight of them.  Here's a few shots of the ones that are being restored (note, the glass has been removed from some of them):


 And, here's some of the glass, washed and ready to be stored until installation day:


We don't have enough of the original lights to do the entire house, so we have selected a few additional finds from the Antique Lighthouse to purchase - beautiful vintage lights of the same era as Glenlochan to add to our collection.  This one will go in the half bath downstairs:

And, this terrific "pull down" original oil, now converted, light will go above the kitchen sink:


We also couldn't resist these vintage floor lamps for the study:


And, we've picked a few additional ones that are not pictured (the remaining lights will be purchased new for now until our budget will allow us to replace them with more vintage finds).  We also found multiple identical glass shades that look like this in Glenlochan:


These were originally hung on a single ceramic socket:


Because we have a matching set, however, we've elected to have pole pendants custom made so that we can hang three of these in a row over the pool table.

Finally, there were 2 lights that we opted not to have restored - both were lacquered brass chandeliers (one large, one small) that turned out to be "builder grade" lighting from that era.  Who knew there was "builder grade" materials in use back then?  In any event, the restoration process is not inexpensive and although most of the lights were valued enough to make the restoration cost worthwhile, we were advised that the builder grade chandeliers were not worth the money or time to restore.  They simply have no value.  As such, I decided that it would be impossible to ruin the light, so I'm playing with making it useable on my own.  Here's the original shot of the smaller chandelier:


Because it had been lacquered, I first used a stripper to remove the lacquer from the brass.  I then tried polishing it:

I made a lot of progress but, in some areas, the pitting was so bad that I could not remove it all - and that was after a LOT of elbow grease.  So, I moved on to Plan B and researched how to paint brass.  I've since followed all of the steps to prepare the surface and paint it with a self-etching primer:


My next step will be to paint it in the finish color - most likely an oil rubbed bronze - and then replace the candles.  I'm not at all sure this will be worth the effort in the end, but I couldn't resist experimenting a bit to see if we might be able to incorporate this into Glenlochan somewhere.  Stay tuned!


Monday, May 27, 2013

The Great Debate II

A lot of people think that the primed Hardie Plank siding currently on the house is the color we selected for the home and we've actually received a lot of compliments on it!  However, this was not the color we intended - it's a little nondescript and although it does match one historic color on the palette, it's not really what we were envisioning.


Although we've been spending a lot of time discussing the right color for Glenlochan, D Day has arrived and decision time is upon us.  Now that the green haze (Virginia's heavy pine tree pollen season that leaves a layer of green on everything in a matter of hours) is almost at an end, the exterior painters are ready to get started which means they need to buy paint which means we need to have a color selected.  Easier said than done.

We knew we wanted to stick to the Benjamin Moore historic color palette, but that limited our universe to 50 plus colors, so it didn't really help.  We then spent time looking at other houses in the neighborhood, researching exterior historic paint colors on the internet, and generally discussing our likes and dislikes.  We then decided we didn't want to go too dark with the color - VA is hot in the summer and dark colors hold in the heat.

Finally, we selected a few colors to purchase paint samples (overall between interior and exterior paint samples, we've dropped a couple hundred bucks "testing" the palette, money well spent!).  We carefully put samples on the back of the house:


Most of the colors we selected are in the blue and green range:


We liked them all, so we decided to "live with" the colors for a week to see if any stood out.  Rob also asked everyone who stopped by for their opinions.  As you can imagine, everyone had a different opinion!  Imagine my surprise when I came back a week later (arriving after dark) and woke up the next morning to find this on the back of the house:


In a momentary lapse, Rob bought a sample of non-historic habanero red - which I quickly dubbed the clown house!  Fortunately, after living with the other colors for a week, we both came down to the same color.


 It's not a true blue, it's not a true green, but it's a rich wonderful blue-green hue.  Added bonus number one - the painter said he had never seen a house that exact color...of course, I'm loving the unique aspect of that.  Added bonus number two - while in the demo phase of the project, we had uncovered sections of the home in the front that we believe to be the original color of Glenlochan - at some point, the home was painted a dark brown, but this layer was actually older than the dark brown.  Here's a few shots we recorded when we uncovered this color a year ago:


Although on-screen these don't appear to be a close match, they actually are - so the color we selected will actually restore the home, as closely as possible, to its original color.


Saturday, May 25, 2013

Vintage Heart of Pine

Although we weren't able to save the downstairs hardwood floors - they had no sub-floor and they had been heavily damaged when covered over with not-so-great wood floors at some point in the past - we are planning to save and refinish the upstairs original heart of pine varying width wood floors.  They will be beautiful with a little sanding and refinishing.


One challenge, however, is that there are a lot of areas that are new upstairs, without existing hardwood flooring, so we needed to figure out a way to fill in the gaps.  The game room is a good example - half of the room is brand new - part of the new addition - without any existing floors, the other half is original with original wood flooring intact.


New hardwood will not match, so we found ourselves in the market for reclaimed heart of pine floors.  Fortunately, ET Moore is just the place to go in our area. Located in a nondescript area of Richmond, one would never know what was located inside!  ET Moore has a showroom, multiple warehouses and processing buildings, and acres of neat reclaimed finds from old warehouses and buildings in the Northeast and beyond.  Here's a few shots of this fascinating place:


After reviewing pictures of our existing flooring to match it up, we had a tour of the place and then selected reclaimed heart of pine for our upstairs flooring.  This flooring was delivered last week and is sitting in the house, acclimating, at the moment:


A note about acclimation:  it was news to me that one does not just immediately go about installing hard wood floors as soon as the materials are delivered.  To avoid warping, expansion, and shrinkage, hardwoods need to sit in the climate in which they will be installed for a period of 2 to 4 weeks or more.  And, for best results, you should not rush this process...at all.  To that end, we've had our HVAC system up and running full force for a while now.  (The air conditioning is an added bonus when working in the house now!).  Not pictured is the nifty "moisture meter" that provides readings of the new wood and existing floors.  Once those two readings are a close match, the flooring can be installed upstairs in the areas that don't have existing hardwoods and any damaged areas can be pieced in.  After installation, the entire upstairs floor will be sanded and then covered in a beautiful finish coat to show off the beautiful grain of the heart of pine.  For now, the wood is acclimating comfortably...!

Tuesday, May 21, 2013

Coloring our World

With the walls primed and the ceilings finished with the sprayer, it was time to select and begin painting the interior walls.  Although Rob gave the pressure roller a whirl in the gameroom, we've elected to do the rest of the house through good old fashioned paint rolling. 

The gameroom was done in a nice beachy peach on the Benjamin Moore Historic Color palette:


The downstairs dining, living, and utilility areas were all painted in a neutral gold tone entitled, "Beacon Hill Damask" - also on the Benjamin Moore Historic palette:


For the kitchen, we chose a sage "Kittery Point Green":


 The stucco on the fireplace received a lovely coat of oil based primer:


The upstairs hall and downstairs master bedroom were done in a stately blue/gray, "Covington Blue"- see Rob in action:


We also spent some time trying various wallpaper samples out for the downstairs breezeway - we haven't selected anything yet.

Two weeks in and the interior painting continues.  We are closing in on the home stretch (thanks to Rob, who had been painting non-stop, while I've been a weekend warrier), but we still have quite a bit of touch up, ceilings to cut in (my job!), and a few rooms to tackle.  Out of all of the interior color selections, we only had one mishap - the lovely yellow we selected for one of the guest bedrooms morphed into a taxi-cab yellow on the walls.  We caught the mistake before we went too far and quickly replaced the color with the lovely historic, "Hawthorne Yellow",  We'll be donating the two full gallons of yellow paint!

The house is coming alive with color.

Tuesday, May 14, 2013

Game-changer? Sort-of (and Retraction!)

After weeks of research and watching on-line videos of airless paint sprayers, we decided to take the plunge and invest in a Graco Magnum LTS airless paint sprayer to try to knock out the interior painting in a more economical way than hiring it out to subs.  Here's our gleaming brand new unit - we started the weekend with high hopes and a healthy amount of skepticism.  Both were justified.  Although YouTube videos illustrate how a room can be fully painted in 6 minutes, we knew that wasn't going to happen.   But, we secretly harbored small slivers of hope that this little box could contain a game-changer for our painting needs.


Two hours in and we were over it - the learning curve is STEEP.  Despite the repeated five star reviews testifying that using this sprayer is so easy a monkey could do it - just pop in the DVD and follow the simple steps to paint your house with ease -  we did not find that to be the case.  We were both crabby beyond belief.  I  finally dared to boldly state out loud what we were both thinking - this was no game-changer. Rob immediately agreed.  Bad investment all the way around.  Using the sprayer is an art form and difficult to master in a few practice strokes.  Retraction portion of this post:  despite my earlier assertion that I am the better wall painter, Rob is the better paint sprayer...by far.  It didn't take long for our shiny new sprayer to be covered in paint.


After I clumsily primed the master bedroom, bath and sitting room, Rob decided to give it a whirl.  At that point, we also realized we had VASTLY underestimated the amount of primer we'd need - that sprayer is a hungry little monster.  So, while Rob took his turn trying to tame the sprayer, I made a paint run for an additional 20 gallons of primer.  Disheartened and discouraged on the paint run, I was doing budget calculations in my head to see if we could squeeze the cost of interior painting onto the project.  However, to my HUGE surprise, by the time I returned, Rob had finished most of the upstairs - all walls and ceilings were primed.  He excitedly exclaimed that it WAS a game-changer after all.  Here's a few shots of Rob in action:


The white film on the above pictures is actually all the paint particles flying around...did I mention that this is one messy job?  Safety first, as always, we both wore heavy duty paint masks the entire time, but I was skeptical that they would really be needed.   They are - it's like walking in a chemical snowstorm and the air quality is about the poorest that I've ever experienced.

Sunday (Happy Mother's Day!) brought a second full day of painting, sort of.  The machine is touchy and requires constant trouble-shooting, disassembling, unclogging of filters, reconnection of hoses, and on and on.  We both probably could quote the trouble-shooting pages of the manual by heart we had to refer to them so many times.  When the machine is working well, Rob could knock out an entire room in 15 minutes - the rest of the time is spent refilling the paint and fixing the constant issues.  I kept busy staying one room ahead of Rob, cleaning up the drywall dust, prepping and clearing the room, and in some cases, covering the floors.  Bottom line, despite the issues, we were able to get the entire house primed and some of the finish coats on the ceilings in a weekend - that would not have been possible with the two of us using rollers and brushes. And, it saves on the arms, neck and ladder climbing, but adds to the stress and frustration level.

A few shots of the fully primed interior:


Did I mention that clean-up also requires some time?  Not only the machine, but also the people - here's Rob with a nice coating of primer (paint your bald spot?).


Next up, the finish paint on the walls.  We have now invested in the pressure roller attachment for the Graco sprayer for the walls.  Hmmm...doubling our investment or throwing good money after bad?  Here's a few of our sample "paint swatches" on the walls as we attempted to line up our color palette:


So, the three painters on this project are not me, myself and I, but rather, Rob, me, and the MAGNUM.  If this post has not dissuaded you from trying an airless sprayer, here's a few tips based on our weekend of experience, knowledge accumulated the hard way:

1.  Clear the room entirely - a completely empty room produces the best results 
2.  Invest in and wear good quality painting masks
3.  Wear only clothes you don't care about or cover up in the dreaded Tyvek suit
4.  Give yourself plenty of time to master the art of spraying.  Practice in a less visible room or area.
5.  Learn the machine, filters, hoses and parts completely before getting started.
6.  Bookmark the trouble-shooting pages in the manual before you get started.  You will need them - the only question is how quickly..
7.   Cover, seal and protect all surfaces that you don't want painted - even if they are completely different floors of the house.  Paint particles have some serious traveling power.
8.  Be prepared for issues, high stress, and don't try this with a deadline.

ENJOY!